Setup an encrypted Arch Linux installation on dedicated Hetzner server
Introduction
I’ve been self-hosting services for a long time. While being fun and educational, with age (and increased disposable income) I’ve come to approciate my own time and having somebody else do the gruntwork where it makes sense. Thus it was overdue for a spring cleaning to consolidate and simplify my setup.
Hetzner comes with praise and cheap prices for their dedicated server offerings. Bonus points for being European with hosting available in the northern European hemisphere. After browsing the server configurations, I found that the basic AX41 model – Ryzen CPU, 64GiB RAM and 2x2TB SATA disks – suited my needs perfectly.
While I daily drive M1 Macs these days, Arch Linux has always had a soft spot in my heart for its simplicity, modularity and great community and software library.
Being security and privacy conscious I wanted my data to be encrypted. Considering Hetzner being one of the biggest providers of dedicated servers, I thought there would be plenty of compiled information out there covering my needs, allowing me to breeze through the installation process. Not so. Instead I found scattered puzzle pieces.
Thus it was only fitting that the first blog entry entailed the story of how the server that hosts it, was setup. Hopefully it will serve as a reference for some lazy soul out there (hello future me 👋).
Please note that this guide is written in arrears based on the sloppy notes I made during the process. While I’ve verified most of what’s written here, and I’m confident in the outlined steps as a whole, I don’t make any guarantees on how copy-paste-friendly it is. Some amount of thought and Linux-saviness is advised.
Having gone through the process and reviewing the steps taken, I’m fairly certain that the whole setup process can be simplified and completed directly from the rescue system. No reboots required. I’ll update the entry if I go down this route and find it viable.
Server purchase
Hetzner provides a service for managing dedicated servers, Robot, which includes functionalities such as power management, firewall capabilities and booting a Debian-based rescue system. You’ll be required to make an account to complete the purchase.
Good to know: After the purchase you’ll get informational emails about the current server status and how to proceed. Just follow them.
Before the automatic server provisioning starts, you’ll get a choice of how you want to logon to the server – either by password or by SSH-key. As we’re going to need an SSH-key for disk decryption, now is as a good a time as any to generate one and have it uploaded:
$ ssh-keygen -t ed2559 -C "identifying comment" -f ~/.ssh/key_name
Once provisioned logon to the server:
$ ssh -o "UserKnownHostsFile=/dev/null" -o "StrictHostKeyChecking=no" -i ~/.ssh/key_name root@server_ip
Installation
Base system installation
Hetzner’s dedicated servers come with an autosetup utility which provides an automated installation process of a base system. Who doesn’t like automation? Let’s use it!
Before the installation can begin however, we need to make some choices and gather information:
- Identify the drives that should be used for installation
- Identify the filepath of the installation image that should be used
- Decide on filesystem and RAID level (if any)
- And the hardest one of all – choosing an appropriate hostname
Identifying the drives is easily accomplished by running lsblk and taking note of the drive letters.
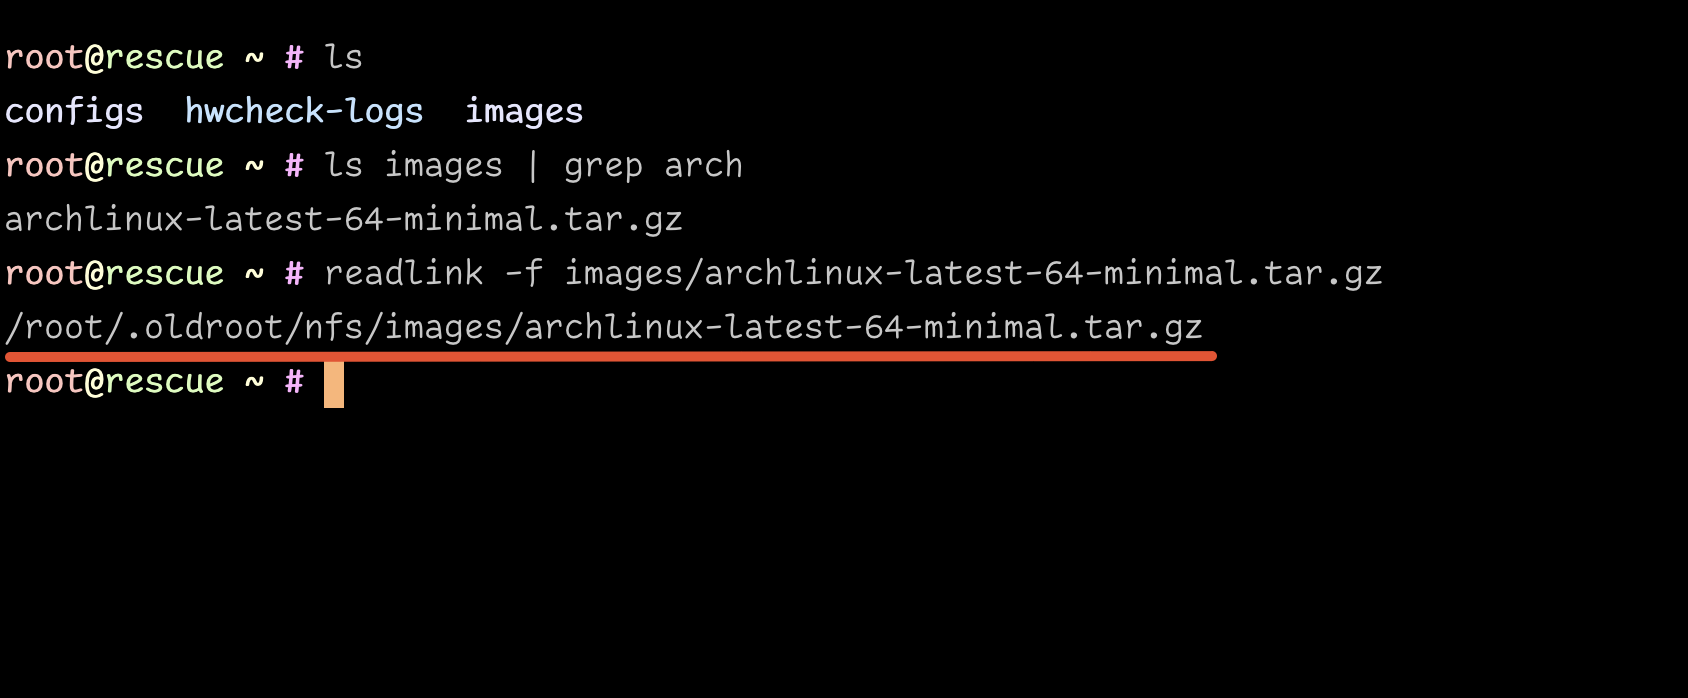
For the installation image filepath, there’s a symlink, images, within the root home directory, which contains all the systems the Hetzner installer has opted to carry. Identify the Arch Linux one and take note of the filepath:
I’ve chosen Btrfs as my filesystem. Considering AX41 comes with 2x2TB drives, and since 2TB is plenty for my needs, I opted for extra data safety by using RAID 1. If you want to wear cool shades and listen to Kenny Loggins (I’m in an 80’s phase…), I salute your bravery but you’re flying solo.
Although Btrfs comes with built-in RAID 1 capabilities, I’ll be using good ol’ mdadm which will be configured automatically for us by the Hetzner installer.
Create /autosetup with the information gathered:
DRIVE1 /dev/sda
DRIVE2 /dev/sdb

# activate software raid and set it to raid-1
SWRAID 1
SWRAIDLEVEL 1

BOOTLOADER grub

HOSTNAME server-name

PART /boot  btrfs     512M
PART lvm    vg0       all

LV vg0   swap   swap     swap         8G
LV vg0   root   /        btrfs        10G

IMAGE /root/.oldroot/nfs/images/archlinux-latest-64-minimal.tar.gz
Note: While the above configuration was correct by the time of writing, it could’ve changed since. Verify the syntax against the provided example configuration files within ~/configs before continuing.
Run the installer by typing installimage. After the installer finishes reboot the server.
SSH-powered decryption on boot
Note: The system can be perceived to be slow at startup. This is due to the disk mirroring running in the background. It will subside after a few hours when the mirroring has caught up.
Without access to a keyboard for decryption, disk encryption poses a problem for remote systems. Luckily we can have an SSH daemon started early in the boot-up process, stalling further progress until a login has happened and a correct password has been entered for the disk decryption.
I will be using tinyssh for my system due to its limited scope of modern features, but there are alternatives; e.g. Dropbear SSH.
Login to the server and install tinyssh with the necessary initram hooks:
$ ssh -o "UserKnownHostsFile=/dev/null" -o "StrictHostKeyChecking=no" root@server_ip
$ pacman -Syu # update the system
$ pacman -S mkinitcpio-{netconf,tinyssh,utils}
Instruct tinyssh which SSH keys are allowed to login to decrypt the main disk:
$ cp ~/.ssh/authorized_keys /etc/tinyssh/root_key
We’re also going to instruct tinyssh to identify the server as the main system upon login. This will allow us to SSH into the server without getting false (but technically true) warnings from OpenSSH telling us that the host key has changed between boots.
Due to how the key convertion utility tinyssh-convert changed how it handles input parameters, there is currently a bug in the mkinitcpio-tinyssh hook installation script. To circumvent this we’re going to manually perform this step, making the installation script skip the affected line when run.
$ rm -r /etc/tinyssh/sshkeydir
$ tinyssh-convert < /etc/ssh/ssh_host_ed25519_key /etc/tinyssh/sshkeydir/
Next we’ll make sure the hooks are included on the next rebuild by editing /etc/mkinitcpio.conf and including netconf tinyssh encryptssh in the HOOKS list. E.g.:
HOOKS=(base udev autodetect modconf kms keyboard keymap consolefont block mdadm_udev lvm2 netconf tinyssh encryptssh filesystems fsck)
Rebuild initramfs to have the functionality run on the next boot:
$ mkinitcpio -P
The system is now setup for disk decryption on boot! 🥳
The astute reader will no doubt have noticed that we don’t have anything to decrypt however. Let’s do that next!
Setup disk encryption
The process for this is quite simple in principle:
- Create a temporary copy of the installed system
- Replace the installed root filesystem with an encrypted one
- Copy the system back
To do this we have to set the server to boot rescue mode on the next boot-up. Login to Robot and mark it for rescue mode and reboot the server.
The rescue system will take some time to start up, so take a bio break, contemplate life, or just grab a beverage while waiting.
Back? Good. Let’s logon to the rescue system and make a temporary copy of our freshly installed system:
$ ssh -o "UserKnownHostsFile=/dev/null" -o "StrictHostKeyChecking=no" -i ~/.ssh/key_name root@server_ip
$ vgscan -v # find our installation volume group
$ vgchange -a y # activate it
$ mount /dev/mapper/vg0-root /mnt # mount previous root onto /mnt
$ mkdir /old
$ rsync -av /mnt/ /old # copy previous root to /old
$ sync # await disc sync
$ umount /mnt # unmount previous /
Important! The system copy only exist in RAM. Above works as I have more than enough RAM available on the server. This also means that any reboot or power outage after the next step will render the system unworkable. To me this is an acceptable risk as it’s a fresh install and easy to redo. If you don’t have enough RAM to handle a copy, or simply find the thought repulsive, you could solve it by creating a temporary drive partition and use that instead as the copy destination. I’m not going to outline that route though.
Remove the volume group:
$ vgremove vg0
With the old volume group gone, we’re going to encrypt the RAID drive before creating a new volume group. This ensures the drive layout is unreadable before decryption.
Before we can encrypt the RAID drive, we need to identify which one is bound to /. We can see this by running cat /proc/mdstat. We want the largest one:
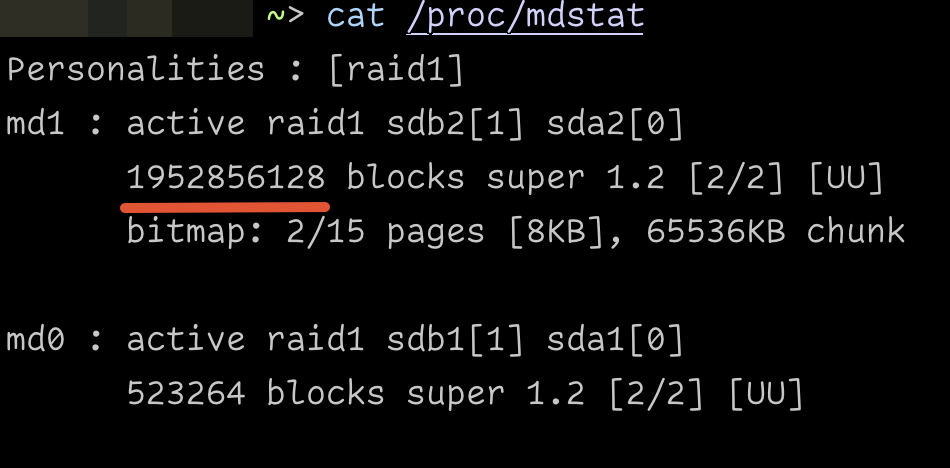
If you feel uncertain you can always double check it. One way to do this is by the process of eliminiation by listing which one is bound to /boot in /etc/fstab:
$ grep '/boot' /old/etc/fstab
For encryption we’re going to use dm-crypt and LUKS. For more information and initiation parameters, consult the Arch wiki.
$ cryptsetup -c aes-xts-plain64 -s 256 -h sha256 -i 5000 luksFormat /dev/md1
$ cryptsetup luksOpen /dev/md1 cryptroot
Create the physical volume and volume group, and partition it:
$ pvcreate /dev/mapper/cryptroot
$ vgcreate vg0 /dev/mapper/cryptroot
$ lvcreate -L8G -n swap vg0
$ lvcreate -l 100%FREE -n root vg0
Initiate the swap and format the root filesystem:
$ mkswap /dev/vg0/swap
$ mkfs.btrfs /dev/vg0/root
With the RAID device partitioning taken care of, let’s copy back our base system onto the encrypted root:
$ mount /dev/vg0/root /mnt # mount encrypted root partition
$ rsync -av /old/ /mnt # copy data
$ sync # await disc sync
Note: As we have successfully restored our base system to disk again, we can easily recover from a power failure from this point on.
Before we can reboot and enjoy the fruits of our labour, we have some additional tasks that needs to be performed. We need to:
- Make the kernel aware that it deals with an encrypted disk
- We also need to make
grubaware of the same
To complete these tasks we’re going to chroot into our system and make the adjustments. Create the necessary additional mount points and chroot away:
$ mount /dev/md0 /mnt/boot
$ mount --bind /dev /mnt/dev
$ mount --bind /proc /mnt/proc
$ mount --bind /sys /mnt/sys
$ chroot /mnt
Let’s start with adding our encrypted root to crypttab and rebuild the kernel initram:
$ echo "cryptroot /dev/md1 none luks" >> /etc/crypttab
$ mkinitcpio -P
Inform grub about our encrypted disk by making sure the following parameters are defined within /etc/default/grub:
GRUB_CMDLINE_LINUX="cryptdevice=/dev/md1:cryptroot ip=dhcp"
GRUB_ENABLE_CRYPTODISK=y
Re-generate the grub configuration file and install it back onto our disks:
$ grub-mkconfig -o /boot/grub/grub.cfg
$ grub-install /dev/sda
$ grub-install /dev/sdb
Everything should be set, so let’s exit the chroot, tidy up and reboot the system:
$ exit
$ umount -A --recursive /mnt # unmount everything under /mnt
$ reboot
Boot up and remote disk decryption
Up until now we’ve been connecting to the server with parameters telling OpenSSH to ignore saving, and checking, the server host key. This is bad practice. As the system is now setup we’ll revert to the default behavior of always checking the host key – alerting us of any funny business.
Give the system some time to go through the initial boot-up phase, and then run:
$ ssh -i ~/.ssh/key_name root@server_ip
You should be greeted by a prompt asking for your disk password. After typing it in and hitting Enter, the connection should close. Give the system some time to finish the boot sequence before connecting to your brand spanking new encrypted Arch system:
$ ssh -i ~/.ssh/key_name root@server_ip
We’re done! 🙌